Getting Started with WLED
Introduction
If you have heard of WLED and are interested in learning more about what it has to offer then this guide is for you.
The purpose of this guide is to provide beginners with a comprehensive but easy-to-follow guide for installing and using WLED. However, this is by no means a fully-comprehensive guide into what all WLED can do, I am still actively learning myself, but what we cover in this series will be more than enough to get you started.
We will go over what tools and components I used for this project, there is a lot of information in here, so please feel free to use the Table of Contents to jump around if you need. This is part 1 of my series covering everything WLED, so stay tuned for part 2!
If you already have a basic understanding of electronics and want to get right to it click jump to “Ready? Let’s get started!”
- Before We Begin
- What is WLED?
- Safety considerations
- Checklist of required items
- Challenges you might face
- Overview of ESP controller, LED strips, and power supply.
What is WLED?
WLED is an open-source firmware developed by AirCoookie intended to control individually addressable LED lights through a user-friendly interface. Since its inception in 2015, WLED has seen massive popularity and is widely supported by a dedicated and creative community.
To date it has hundreds of built in effects and color palletes, making it so having dynamic, colorful lighting is easy and accessible. If you are looking to set up holiday or party lights, enhance your gaming or movie experience, or add some tasteful accent lighting to your home then WLED is your answer.
Safety Considerations
Choosing the Right Power Supply
When you are choosing an external power supply, it is vital to match the voltages of your LED strips to your power supply. (12v to 12v and 5v to 5v, any other way and it will fry or not turn on). Another consideration is the power draw from your LEDs. More LEDs = More Amps. This isn’t necessarily an issue for smaller set ups (>100 lights) as the ESP can power these.
- Always ensure the device is unplugged before touching any bare terminals or contact points.
- NEVER work on a live circuit, even though these are low voltage and you probably will not feel it if it shocks you, its best practice and a good habit to start now.
- Do not touch bare wires or contact points while the device or lights are powered on. Have electrictal tape or shrink tubing on standby to cover exposed wires.
Example of Overhead Consideration
I have a strip of 300 5v LEDs that I want to power. If each LED draws max 55 mA then that means the strip draws a maximum of 16.5A (55 * 300 / 1000). Which means you want roughly a 20A power supply.
Avoid Working on Live Circuits
Be mindful of current usage; even low amps can be dangerous. For higher currents, consider an inline fuse to protect your power supply and prevent electrical fires.
Proper Ventilation and Cooling
LED strips get hot. When testing, unroll the strip or limit testing time to a few seconds. For permanent setups, use aluminum channels to hold strips and dissipate heat. Use your multimeter to check for continuity between points and to verify voltages. Also when you solder make sure to do it in a room with plenty of ventilation, preferably with a fume extractor.
Materials Checklist
- BTF-Lighting WS2812B LED Strips
- ESP Controllers - 3 pack
- Dupont wires
- Multimeter(Optional, but recommended)
- Breadboard(Optional, but recommended)
- USB Type C Data cable
- Computer with Google Chrome installed
Advanced Tools
- Soldering Iron or Station
- Lead-free flux core solder
- Flux
- Shrink tubing
- Wire strippers
- 20 AWG Wire
- 5v 20A Power Supply(Recommended for larger projects)
- Heat gun or lighter
- Workbench
- Scissors or wire cutters
The tools and materials I list here are items that I purchased myself. However, what I chose here isn’t the final say in quality or affordability. This is just what works for me, if you can find something less expensive or higher quality than what I chose, go for it! I HIGHLY recommend not cheaping out on a soldering iron, you get what you pay for.
ESP Controllers
ESP32 vs. ESP8266
ESP32 is preferred for better CPU, memory, and performance.

-
The ESP-32 has a dual-core processor running up to 240MHz compared to the 8266’s single core processor with a clock speed of only up to 160 MHz, making it harder to perform multitasking capabilities.
-
In addition to a slower clock speed, the 8266 also has siginificantly less RAM with a maximum up to 4 MB.
-
The ESP-32 on the other hand, can have up to 16 MB of flash memory.
-
The ESP32 also supports dual-band Wi-Fi and Bluetooth Low Energy. While the 8266 only supports 2.4 Ghz WiFi.
-
Finally, the ESP32 has many more GPIO pins which means you can hook up more LED strips to the controller, the 8266 can only control 3 different strips at one time.
When it comes to actually choosing which ESP32 to get, the task can seem even more daunting, as there are many many different types of ESP controllers out there and it would take me weeks to go through the differences in each one(S2,S3,C2,C3,DEVKIT,WROOM, etc). So for now, just know the model ESP32 controller we are using is the ESP-WROOM-32.
Other WLED Controllers
-
QuinLED
-
Gledopto Zigbee LED Controllers These controllers offer Zigbee-based connectivity and can be controlled via Zigbee hubs (like the Philips Hue Bridge or Zigbee-compatible hubs). They are compatible with WLED through integration with Home Assistant, making them a good choice for those who prefer Zigbee over Wi-Fi.
-
Dig-Uno A controller that is compatible with WLED and integrates easily into a smart home setup. It is similar to the QuinLED, offering multiple outputs and configurable ports for controlling large LED installations.
LED Strips
Manfacturer
BTF Lighting is recommended for affordability, color quality, and reliability. One downside: adhesive backing may wear off; consider using double-sided tape for more permanent setups.
Model

- Individually addressable - each LED can display different colors and brightness levels which allows for dynamic lighting effects
- Ease of control - can be controlled with RPI, arduino, and other controllers, straghtforward programming and customization
- Flexible design - can be cut to length, bend around corners, stuck to surfaces or channels
- Comprehensive tutorials - BTF lighting provides detailed guides and tutorials
- Cost effective - budget friendly alternative with minimal compromise
- Versatile - you can buy them in an IP67 waterproof coating, allowing use in wet and humid areas like your bathroom
Ready? Let’s Get Started!
Now that we have all that out of the way, lets get to actually installing WLED.
Install CP210x Driver
In order for your computer to detect and communicate with your ESP, you will need to install the CP2102 driver from SILabs.
- Install the CP210x driver for your OS to allow your computer to detect the ESP.
Flash WLED to the ESP Controller
- Open Chrome (not Firefox) and go to install.wled.me.
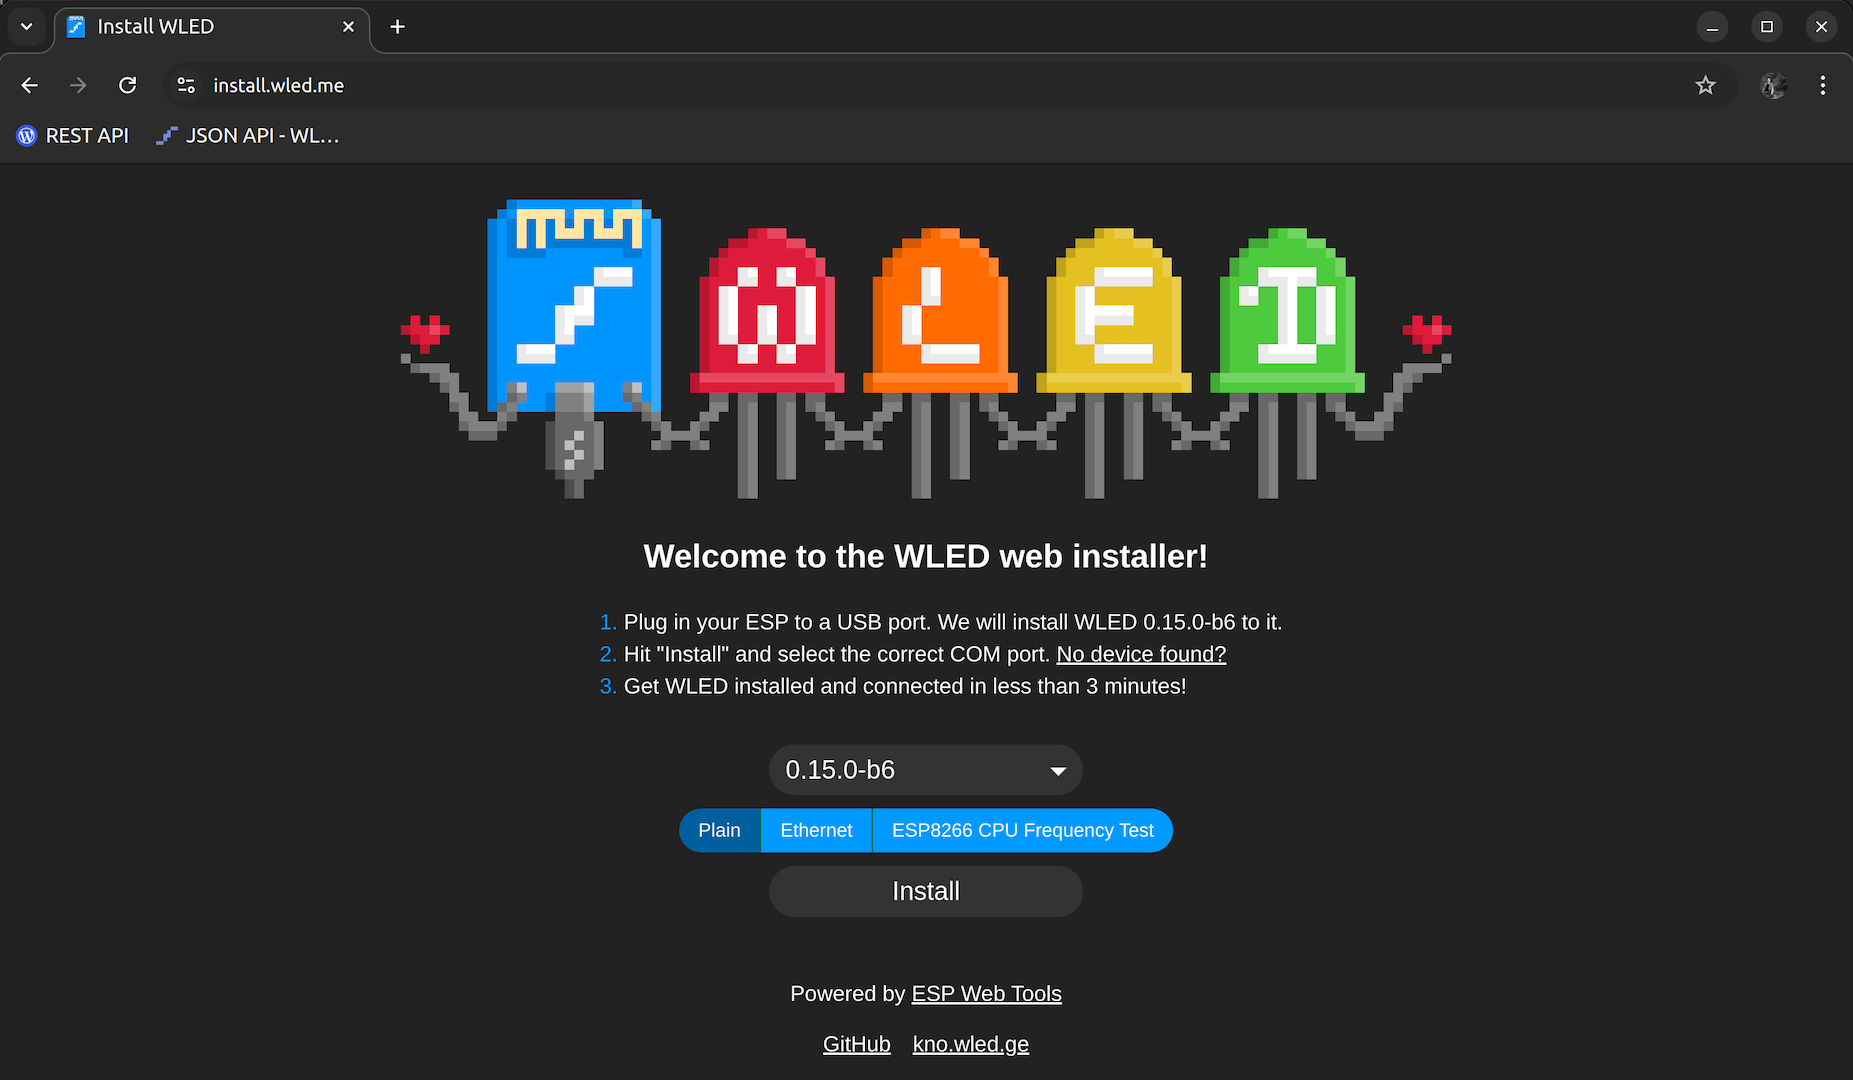
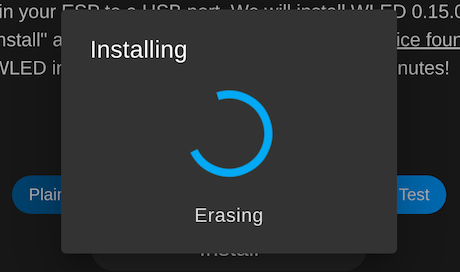
- On your ESP, hold the BOOT button while plugging it into your computer. Continue to hold the BOOT button down until you reach step 4.
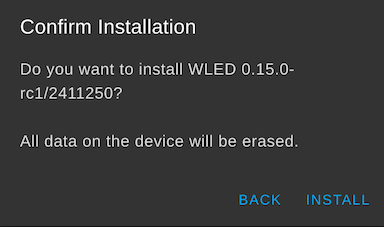
- Click Install on the website, then select “CP210x USB to UART BRIDGE” in the pop-up window, and follow the prompts.

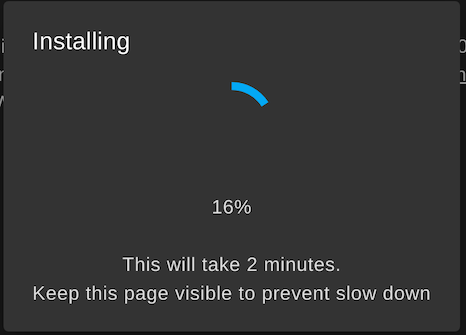
- Release the BOOT button when you see “Erasing”, the flashing process will now begin.
-
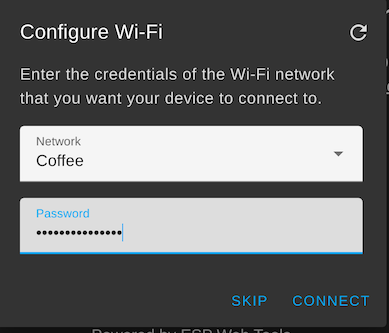
After flashing, connect to Wi-Fi, select your network, and enter your password.
-
Once you connect to your Wi-Fi, click “Visit Device. You will be redirected to the WLED home screen.

-
Congratulations! You have flashed your ESP with the WLED firmware. What’s next?
User Interface
Menu Navigation
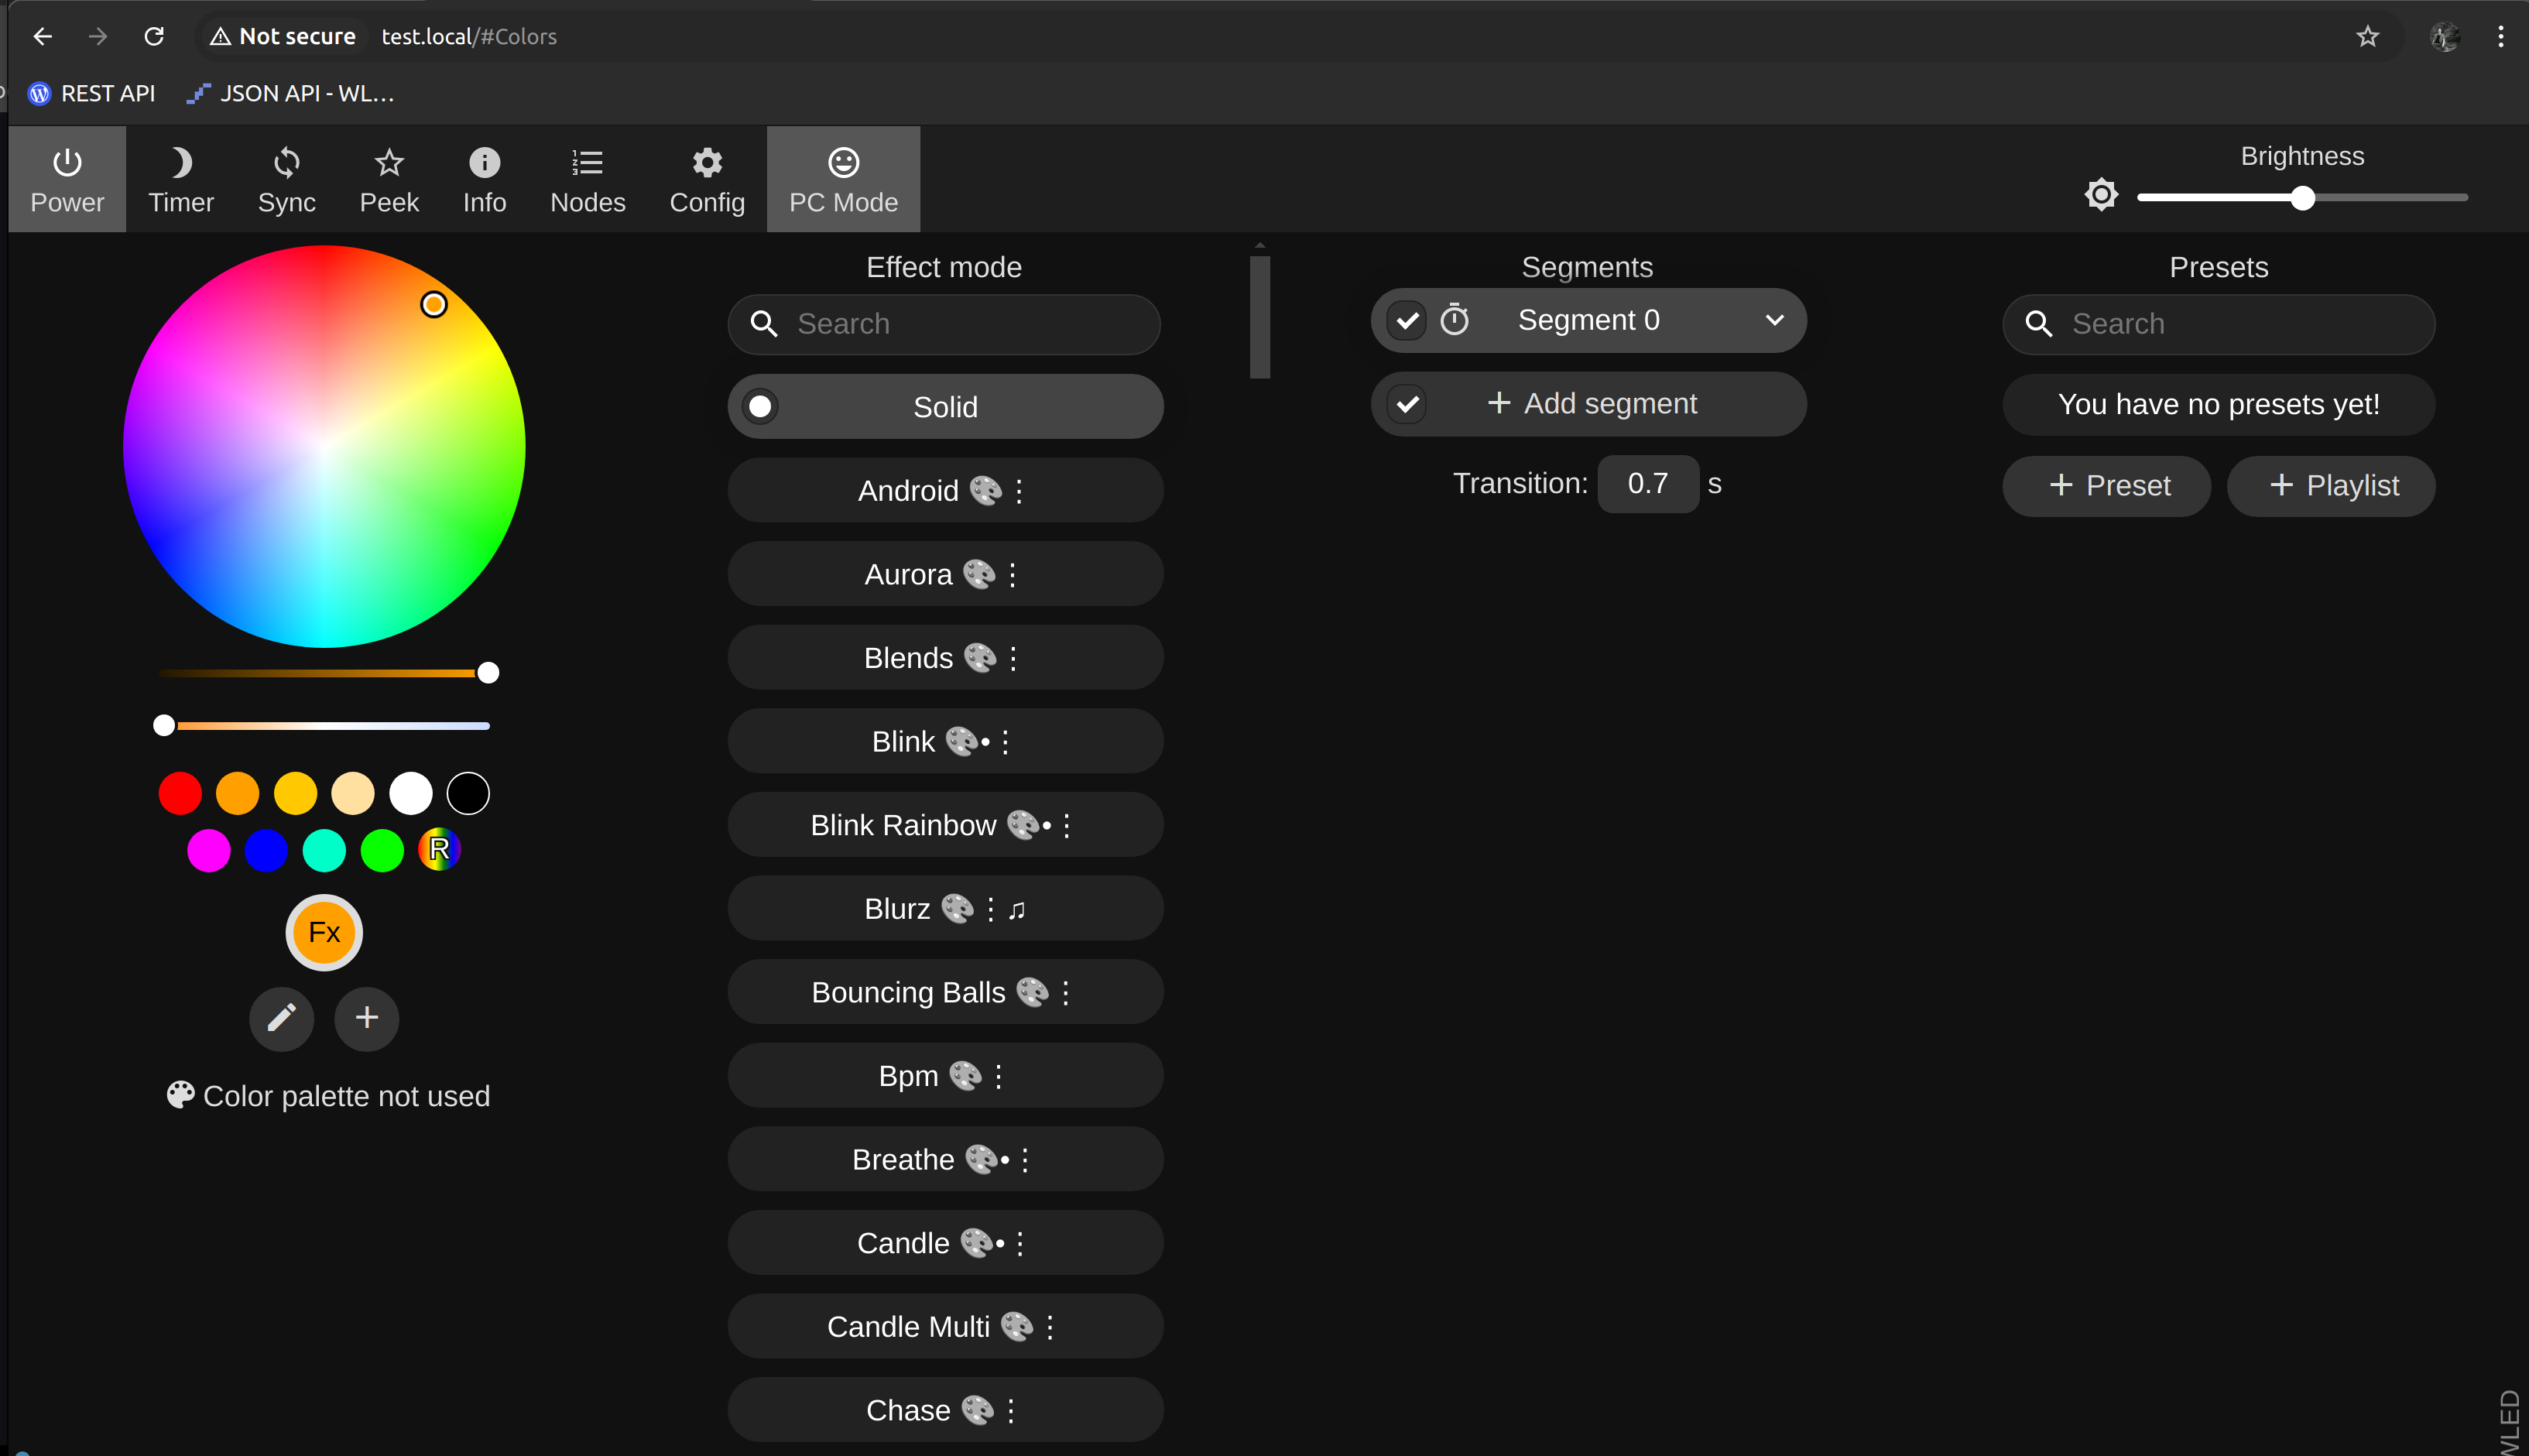
If everything worked correctly, you should now see a menu like the one above. Welcome to WLED. You may notice your address bar looks a little different than mine. Yours most likely starts with 192.168.x.x. Looking at the top bar from left right:
- Power button - turn LED strips on/off
- Sleep timer - sets a 60 minute sleep timer, configurable
- Sync button - sync any effects you make on one controller with others.
- Peek - shows a preview of the chosen effect
- Info - shows device and network info
- Nodes - shows other WLED devices
- Config - settings
- PC Mode - toggle between PC/mobile view
Moving from left to right columns:
- Color picker - choose what colors you want displayed, click on an effect to reveal more options and palletes.
- Effects mode - choose what effect to display on your LED strips
- Segments - divide your strip into segments that can behave independent of one another for more creative effects.
- Presets - once you have some cool colors and effects made you can save them as presets and assign them as default so they run each time you power on WLED
In this next section, we will go through some basic settings and configuration. We will go through how to assign a static IP, set up mDNS, configuring your GPIO pins, and setting up our first effect.
Initial Configuration
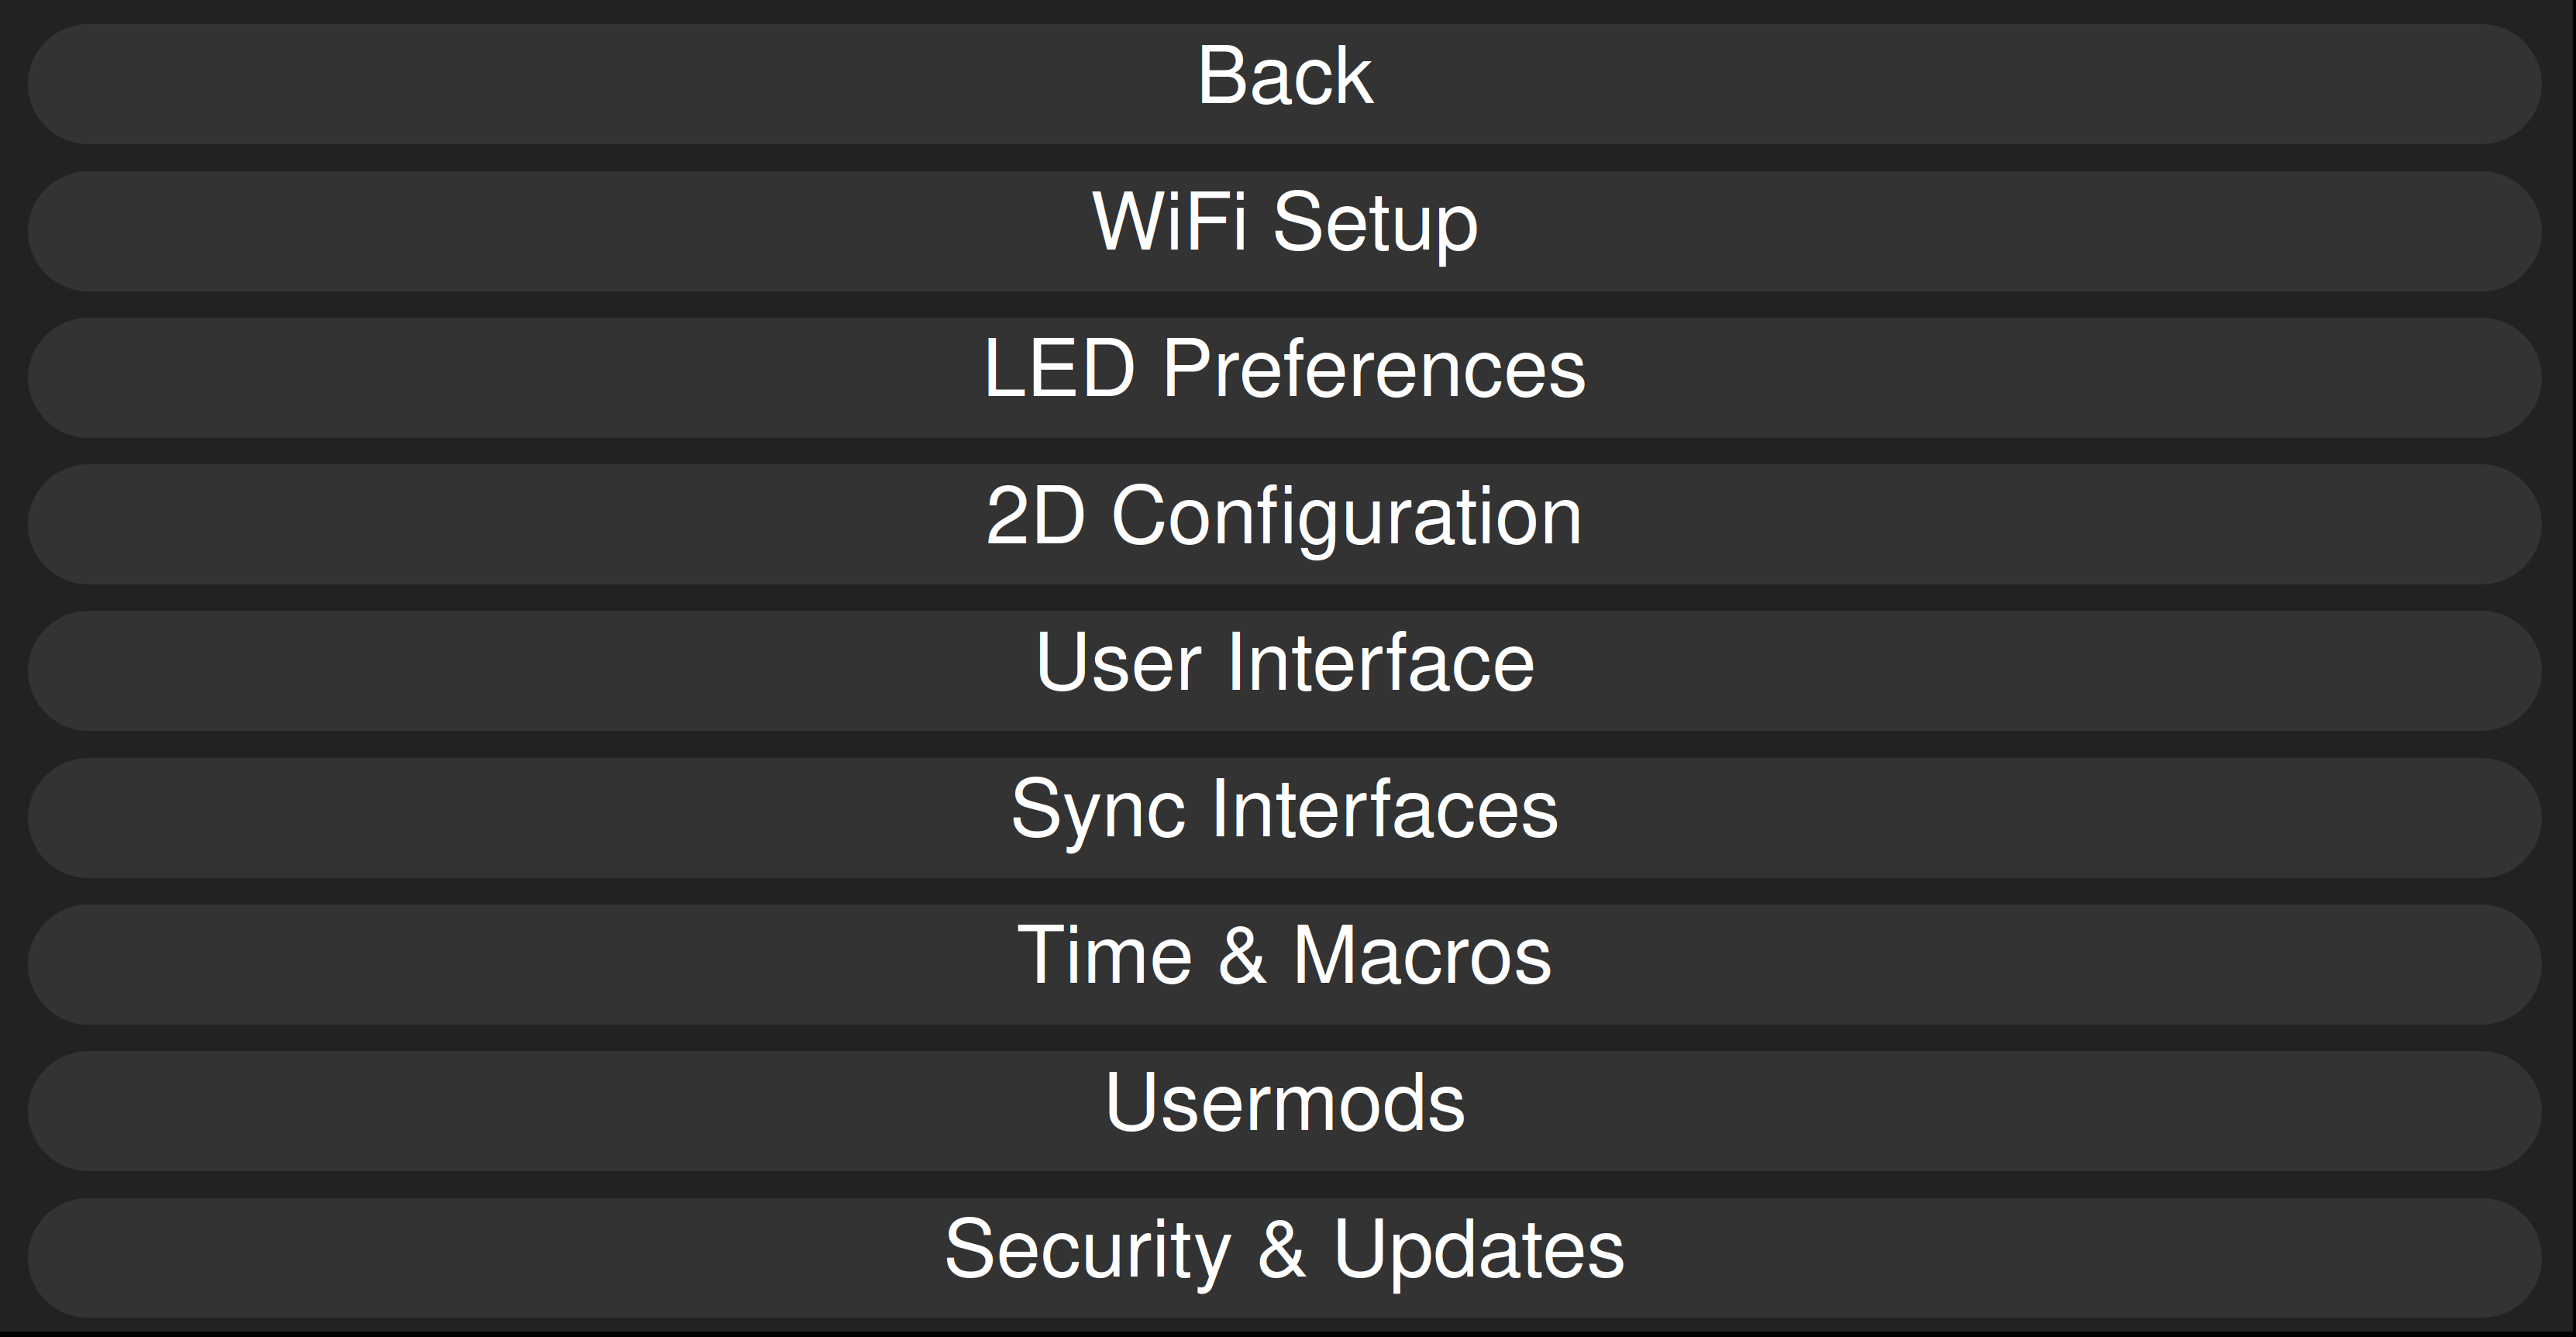
Click on the “Config” in the top toolbar, here we will:
- Configure Wi-Fi settings, assign static IP, configure mDNS
- Assign GPIO pin on our ESP, configure LED strip length
- Configure power settings
- Create presets, default effects
Assigning a Static IP Address
Lets begin first with assigning our ESP a static IP address, so it doesn’t change and we lose access when the DHCP lease is up.
Click on “WiFi Setup”, you should already be connected to your WIFI network, otherwise we wouldn’t see this screen.
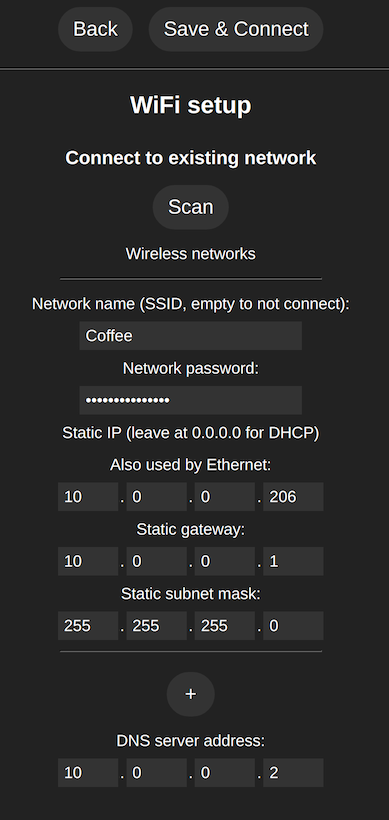
- To make things simpler, assign your ESP its current IP address(the IP address you see in the address bar) as the static IP. This goes in the box “Also used by Ethernet:”
- “Static gateway” is your routers IP address. If your network is 192.168.0.x then your router will most likely be 192.168.0.1.
- Subnet mask will most likely be 255.255.255.0 if you are on a standard home network.
- DNS server address you can leave as is, but I have mine pointed to my pi-hole(keep a look out for my guide on setting up and configuring pi-hole.)
- I migrated my network from a 192.168.x.x to a 10.0.0.x subnet for easier naming convention, so your set up may be different.
Configure mDNS
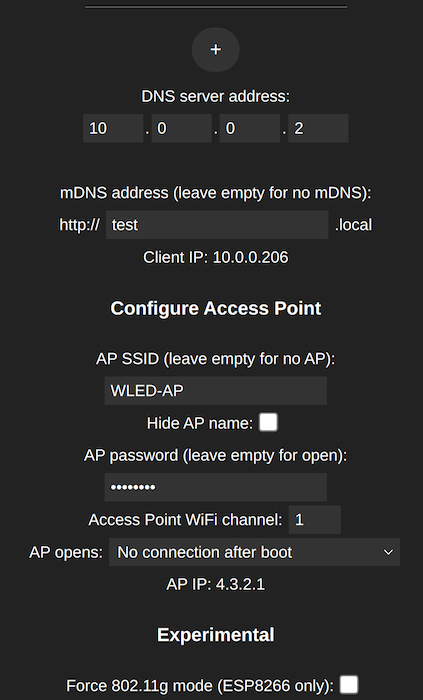
Moving down the page we see an option for mDNS. What this means is rather than having to type in the IP address of your controller every time you want to access it from your computer, you can assign it a friendly name that you would type in instead. Here I named mine “test”.
The settings below that regarding configuring an access point and other experimental features are outside of the scope of this guide, and we will disregard them for now.
Once you have a mDNS name for your device click “Save and Connect”.
Take a second to test its working by going to http://test.local (or whatever you named yours). If that works then great job, let’s move on to “LED Preferences”
LED & Hardware Settings
Here we can configure which GPIO pins we want to use, the LED strip type/length, the pixel order, and fine tune your power settings.
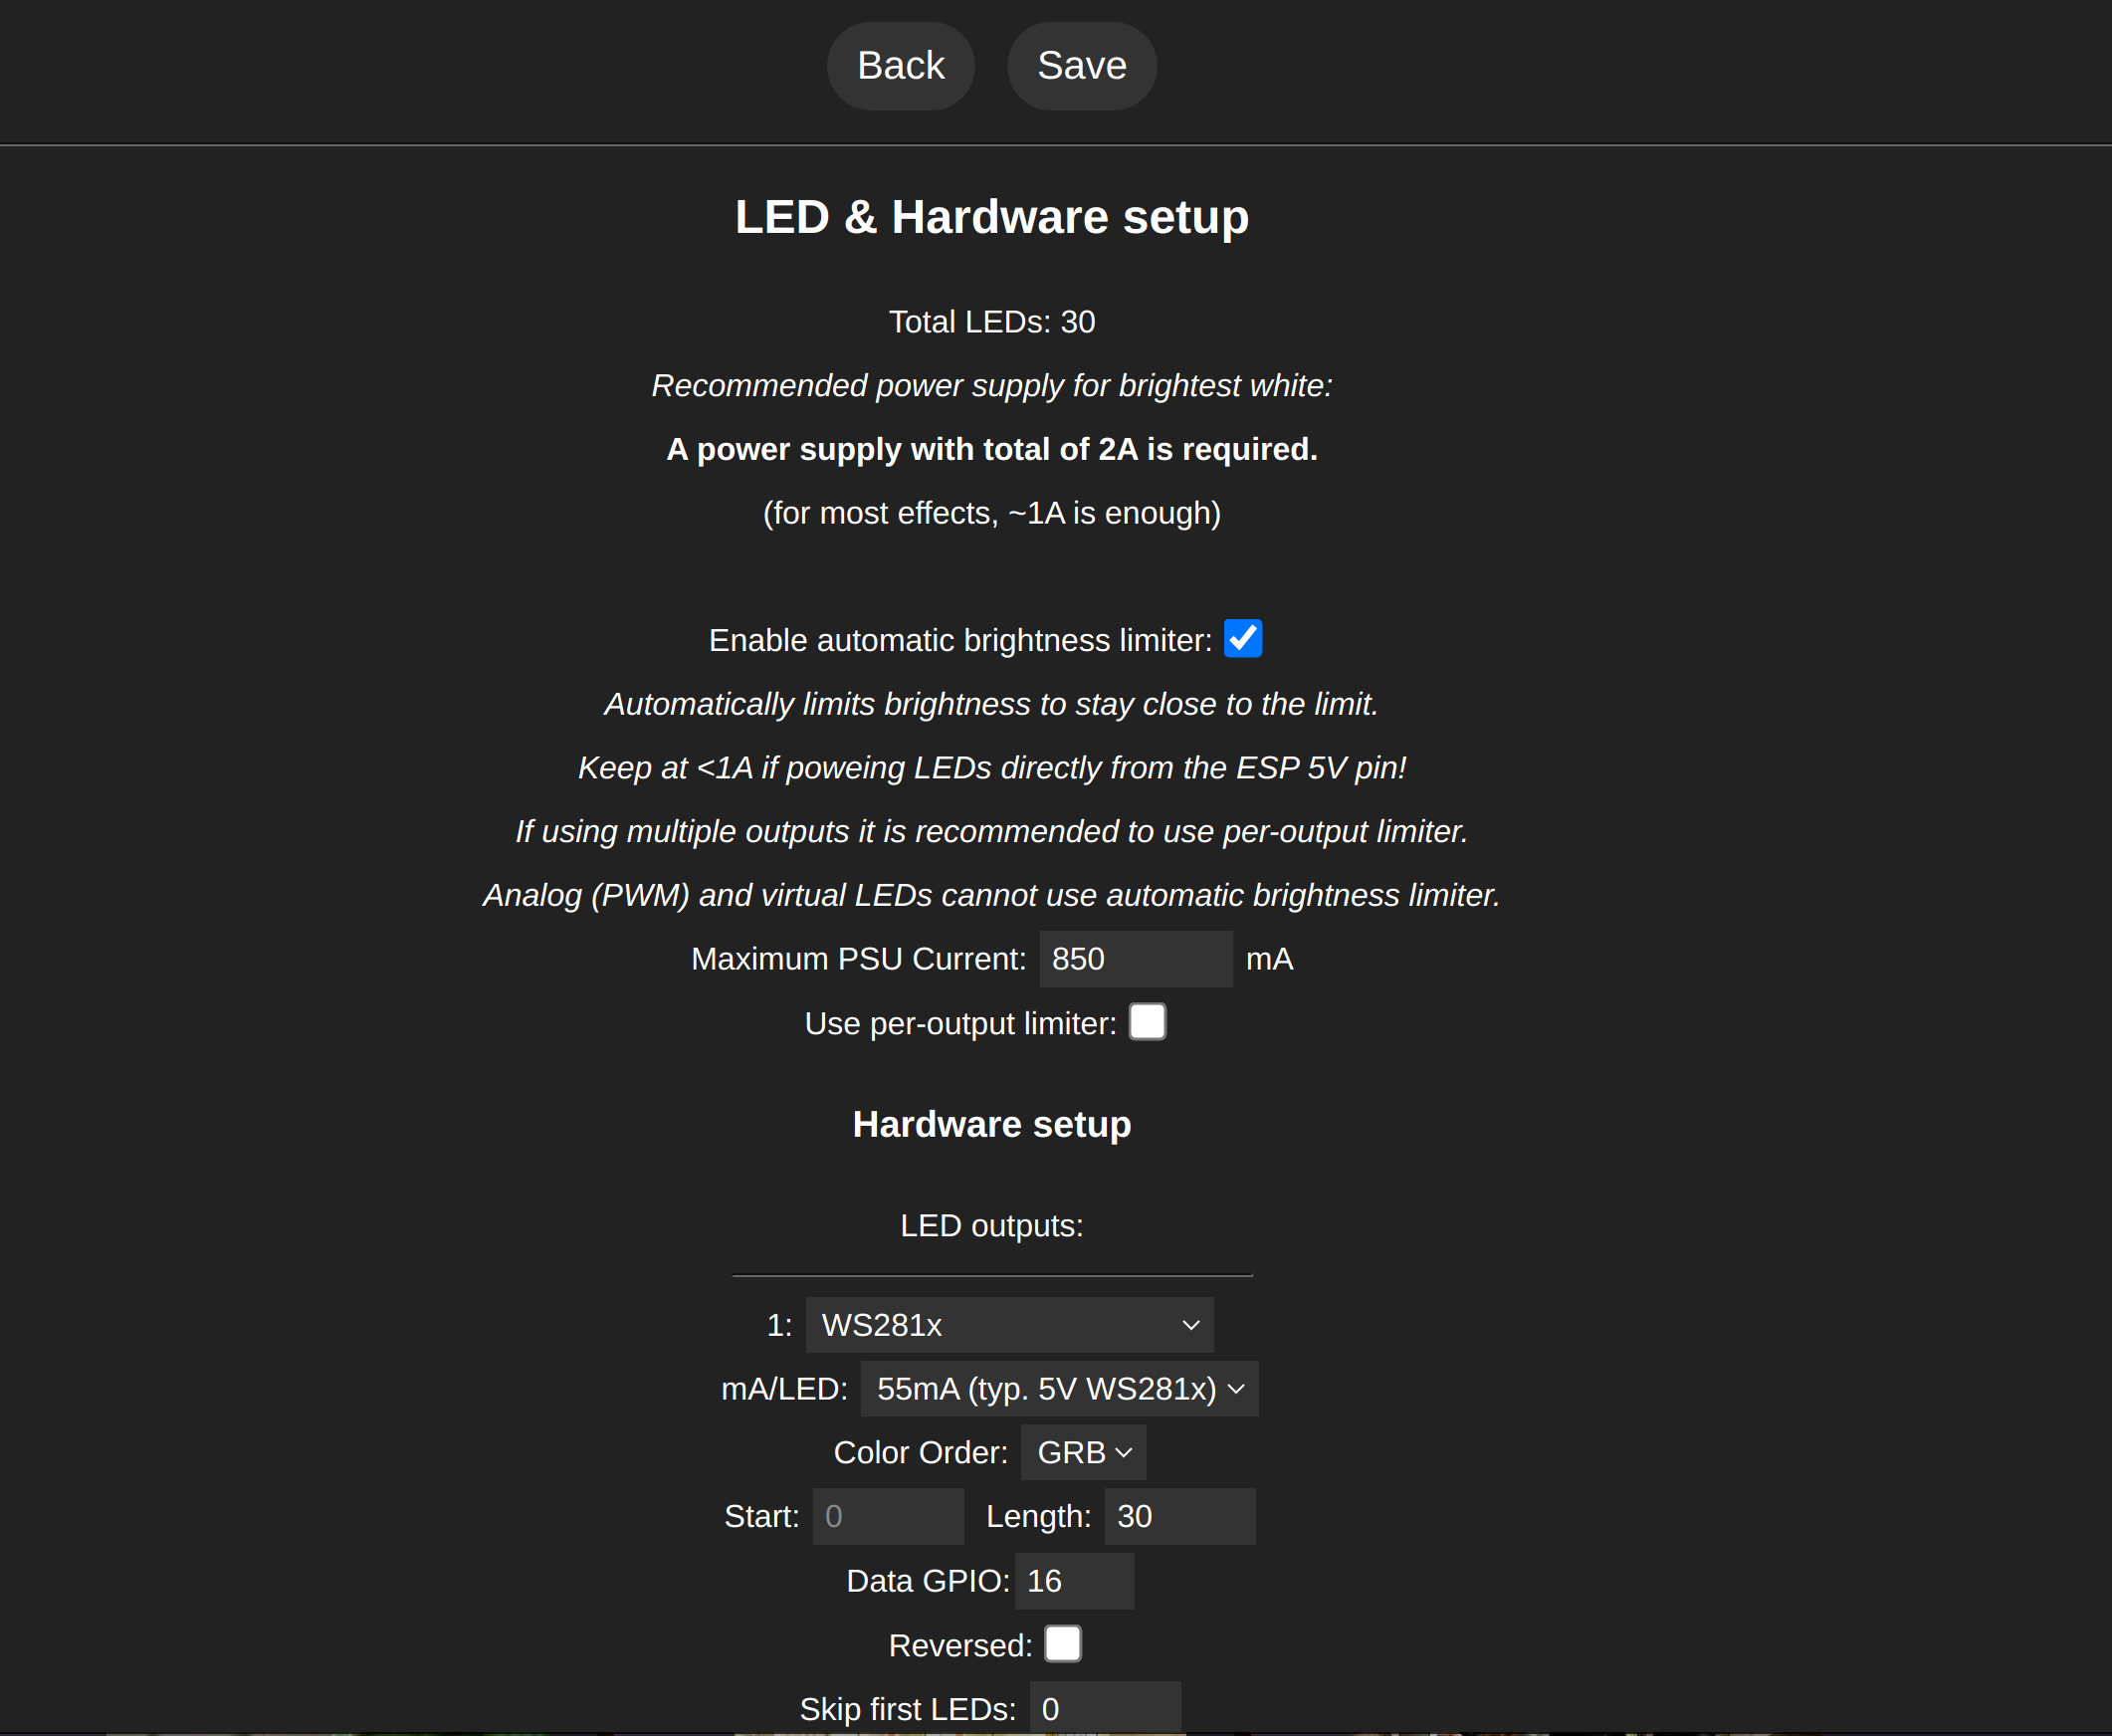
-
WLED includes an automatic brightness limiter which limits the current draw, I recommend keeping this on as it will protect your controller from overdraw.
-
Since we are powering our LED strip from our ESP and not an external power supply (for the time being) we can leave the maximum PSU current at its default state of 850mA.
-
You can go up to a maximum of 1A(1000mA) but I would not exceed that as the ESP is not designed for higher currents.
The first dropdown menu reveals the different types of LED strips WLED is compatiable with, we can leave this as is since we are using the WS2812B. Same with mA/LED and Color Order, these stay as they are.
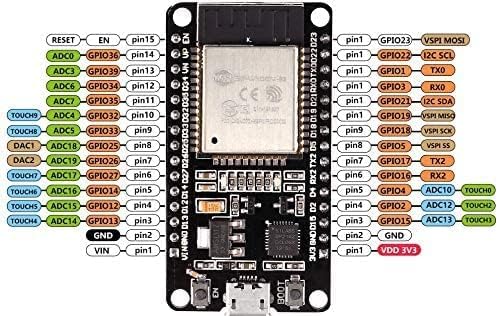
The Data GPIO refers to which pin the data signal will be sent to. I like to change it to 13 as GPIO13 (pin 3) is right next to the GND and VIN pins on my controller.
When you have multiple LED strips that you would like to connect you can add another output channel by clicking the top ‘+’ button right under “Off Refresh”, this will add another configurable channel.
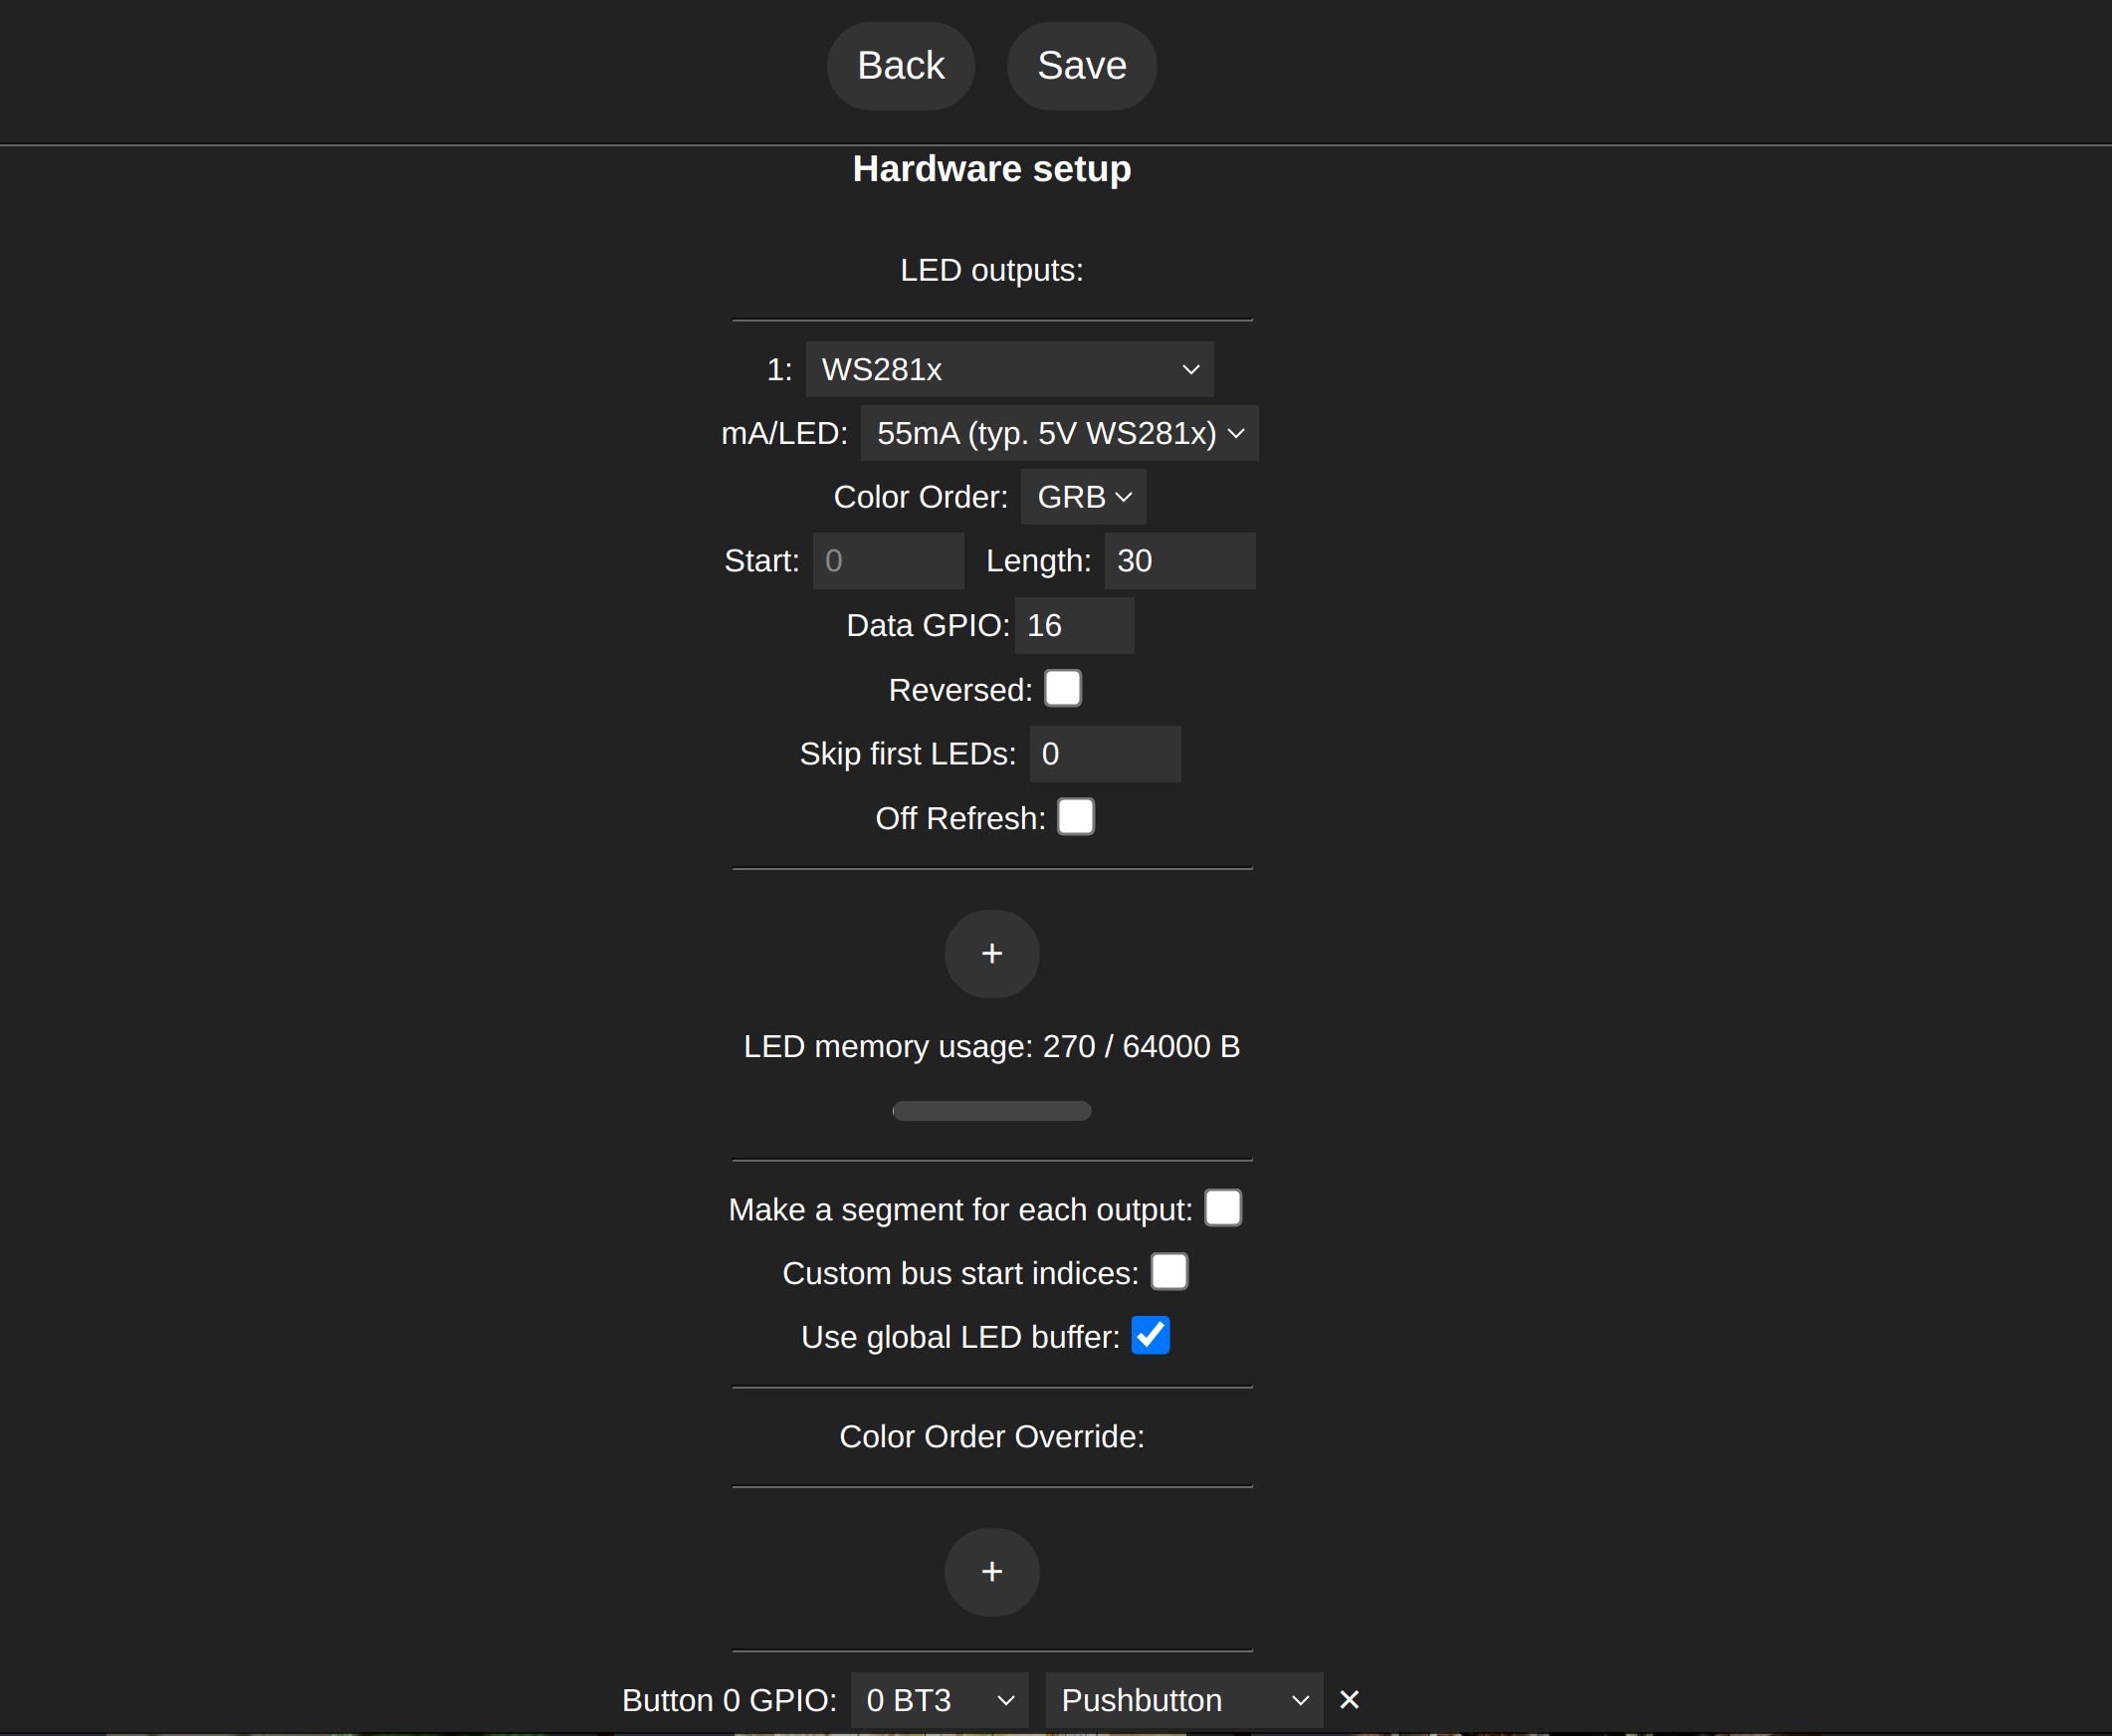
Once you have the GPIO pin set click save. Now lets turn to our LED strip.
Connecting our LED Strip
There are a number of ways to connect your LED strip to your controller, but today we will go for the simpliest method, 3 Male-to-Female dupont wires.
- If your strip is still rolled up unroll the first few feet, its best practice not to light them when they are rolled up as they can overheat very quickly, in a matter of seconds.
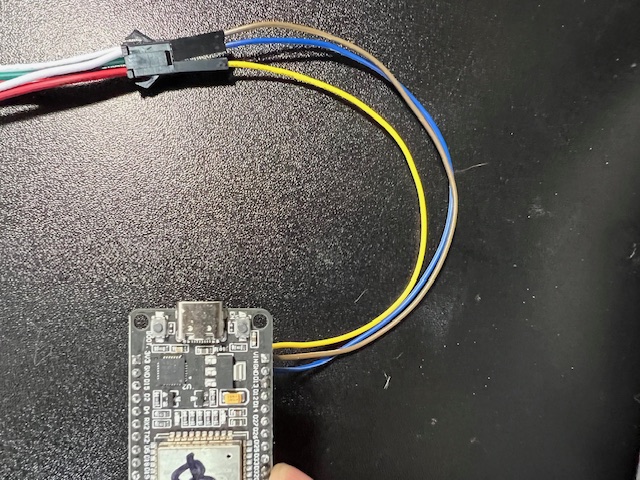
LED Strip 5v (Red) -> ESP Vin (Yellow) LED Strip GND (White) -> ESP GND (Tan) LED Strip Data (Green) -> ESP Pin 13 (Blue)
Verify you have the correct GPIO pin set, then plug in your controller. Let there be light!
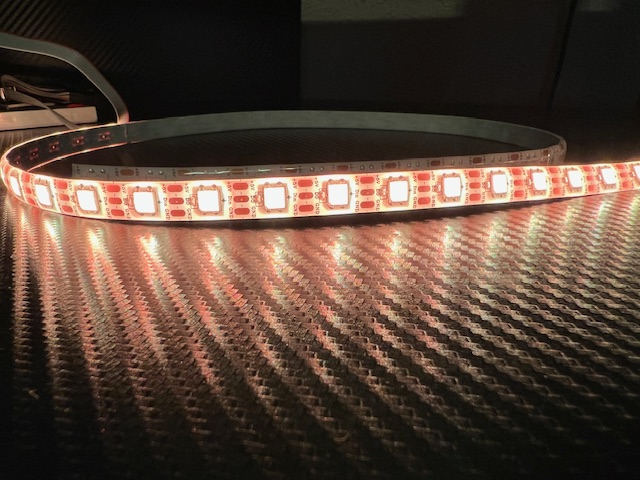
Voila! You are ready to move on to messing with some cool, dynamic effects. You should have enough knowledge now to start messing around for yourself.
Figure out how to use segments, how to combine effects and come up with your own. But just in case you still need a little help, stick around and keep reading my “WLED for Beginners” series. I will be updating this post with part 2 soon!
Below I talk about some lessons I’ve learned along the way and some tips and resources that I used to get me started.
Lessons Learned
Faulty equipment/components
Most small components, including LED strips are mass produced in China, so QA isn’t always a priority. Be mindful of where you are buying your tools and components. I have yet to have a bad experience purchasing from Amazon and all links I provide I have personally purchased from myself, but your mileage may vary. One thing I would not cheap out on is a soldering iron, stay away from those cheap $20 pencil irons, they are a waste of money. Also always keep your receipts.
Botched soldering jobs
The most frustrating part for me in this whole process was learning to solder. You WILL mess up, it WILL look jank in the beninging but thats okay, don’t give up. One bit of advice I can offer is to use flux when soldering. Flux helps the solder flow on to the thing you’re soldering, whether its a copper pad, wires, a header pin. Even with a flux core solder you still want to add some additional. The 2 biggest issues for beginners is not enough flux or the iron isn’t hot enough to melt the solder.
Stay tuned for my “Basics of Soldering” guide where I will explain this in further detail and show what happens when you don’t use flux or use a cold iron.
Inconsistent power/signal drop
This is an issue that probably won’t affect you until you start setting up longer runs of LEDs with longer power/data cables, or connect multiple strips to a single controller. The main cause of this (especially in 5v LEDs) is voltage drop. This can cause all sorts of unexpected behavior such as flickering or dim lights, incorrect color output, and crazy lights.
We will go over how to introduce power injection and use logic-level shifters to alleviate this in Part 2.
Incorrect wiring and polarity issues
This is why my multimeter became one of my favorite and most used tools, a common issue for beginners is reversing the polarity on their power lines, not properly grounding their lights to their controller, or not plugging the data line into the correct GPIO pin. Having a multimeter with a continuity functionality also comes in handy when checking to make sure there is a solid connection between 2 points.
Network connection/configuration issues
If you are familiar with connecting a device to a Wi-Fi network, then 8/10 times you will not run into an issue that is network related. However everyone’s home is different, and sometimes discovering the device on the network isn’t always as straight forward as powering it on and connecting to the network. Every once in a while it can take a bit of troubleshooting, googling, trial and error to get the dang thing to connect.
We wil go over troubleshooting in Part 2.
Learning curve with new tools and concepts
Not only are we learning how to set up some cool lights, but we cover a bit of networking, soldering, flashing firmware, electricity, physics etc. Don’t get discouraged if you get stuck or feel you can’t fully grasp a new concept right away. We’re here to not only learn but to have fun and have something to show for it while we do it. Give yourself some grace, step away for a a day or 2, then revisit the obstacle. One of the best features of WLED isn’t in the firmware itself, but its the amazing and supportive community. Check out their forums, knowledge base, or even any of these YouTubers who helped me get started, chances are they will be able to answer your question better than I can
- Wiring pro tips - https://kno.wled.ge/advanced/wiring/
- Various WLED tutorials - https://kno.wled.ge/basics/tutorials/
- Step by step video tutorials, soldering basics, power injection, great for project ideas: https://www.youtube.com/@ChrisMaherDIY
- DIY WLED/HomeAssistant projects, also great home automation videos: https://www.youtube.com/@ResinChemTech
- Various WLED, xLights, holiday lighting tutorials: https://www.youtube.com/@DrZzs
- Home automation and WLED tutorials, product reviews: https://www.youtube.com/@makeitworktech
If you still feel like you aren’t finding the answer, or there just isn’t something thats clicking with you, or would like some more tips, then please feel free to reach out to me on Discord or shoot me an email. We will figure it out together. I owe everything I know to the smart and kind people who took their time to put this information out for free, so I am simply returning the favor to the community. :)
Thank you for taking the time to read my first ever blog post.
-T